


Ever tried to generate an AI video that starts beautifully but ends in a completely different mood? That is the exact problem Kling AI Start/End Frame is designed to solve. Instead of asking AI to guess the entire shot from one image or one prompt, you give it two visual anchors: where the clip begins and where it should land.
With frame-to-video control in insMind, Kling can build the motion between those two moments. You upload a start frame, upload an end frame, describe the transition, choose your settings, and generate a polished clip that feels more intentional. For creators, marketers, designers, and social media teams, that extra control can be the difference between a random AI result and a smooth, usable video.
In this guide, you will learn how Kling AI Start/End Frame works, when to use it, what prompts make transitions smoother, and how to create a finished start/end frame video with insMind step by step.
Table of Contents
- 01 What Is Kling AI Start/End Frame?
- 02 When to Use Start Frame Only for Smooth AI Videos
- 03 How to Create Smooth AI Video Transitions with insMind
- 04 Best Use Cases for Start/End Frame Videos
- 05 Prompt Tips for Better Kling Start/End Frame Results
- 06 FAQs About Kling AI Start/End Frame
- 07 Create Your Smooth AI Video Today
What Is Kling AI Start/End Frame?
Kling AI Start/End Frame is an image-to-video workflow where you provide two key images. The first image defines the opening shot, while the second image defines the final shot. Kling then generates the in-between motion so the video moves from the start frame to the end frame.
Think of it like giving AI a storyboard with two fixed points. You are not only saying, "make this image move." You are saying, "begin here, end here, and make the path between them feel natural." That makes the workflow useful for scene changes, before-and-after reveals, product transformations, character movement, landscape lighting shifts, and cinematic transitions.
You can still guide the result with a prompt. The prompt tells the model what kind of motion, mood, camera movement, and visual style to create between the two frames. A simple prompt may work for basic movement, but a clearer prompt usually gives Kling a stronger creative direction.
When to Use Start Frame Only for Smooth AI Videos
Do you always need both a start frame and an end frame? Not necessarily. A start-frame-only workflow can still create a smooth AI video when the clip only needs gentle motion, a natural camera move, or a mood-based animation that does not have to land on a specific final image.
Use start frame only when your first image already contains the full story. A portrait that needs a subtle smile, a product shot that needs a slow push-in, a landscape that needs moving clouds, or a social post that needs light motion can often stay smooth with one visual anchor. In these cases, the prompt controls the movement while the start frame keeps the scene recognizable.
But if smooth means "arrive at this exact ending," start/end frame generation is the better choice. The two-frame video maker approach helps when the final pose, lighting state, product reveal, before-and-after result, or day-to-night change matters. It reduces guesswork because Kling can see both the starting point and the destination.
A simple rule helps: use start frame only for open-ended motion, and use start plus end frames for controlled transitions. That way, your video feels smooth for the right reason: either because the movement is subtle and natural, or because the beginning and ending are visually connected.
How to Create Smooth AI Video Transitions with insMind
Ready to try it yourself? The process in insMind is simple: upload your two frames, write a transition prompt, choose the Kling video settings, then generate and download the result. Use the four steps below as your workflow.
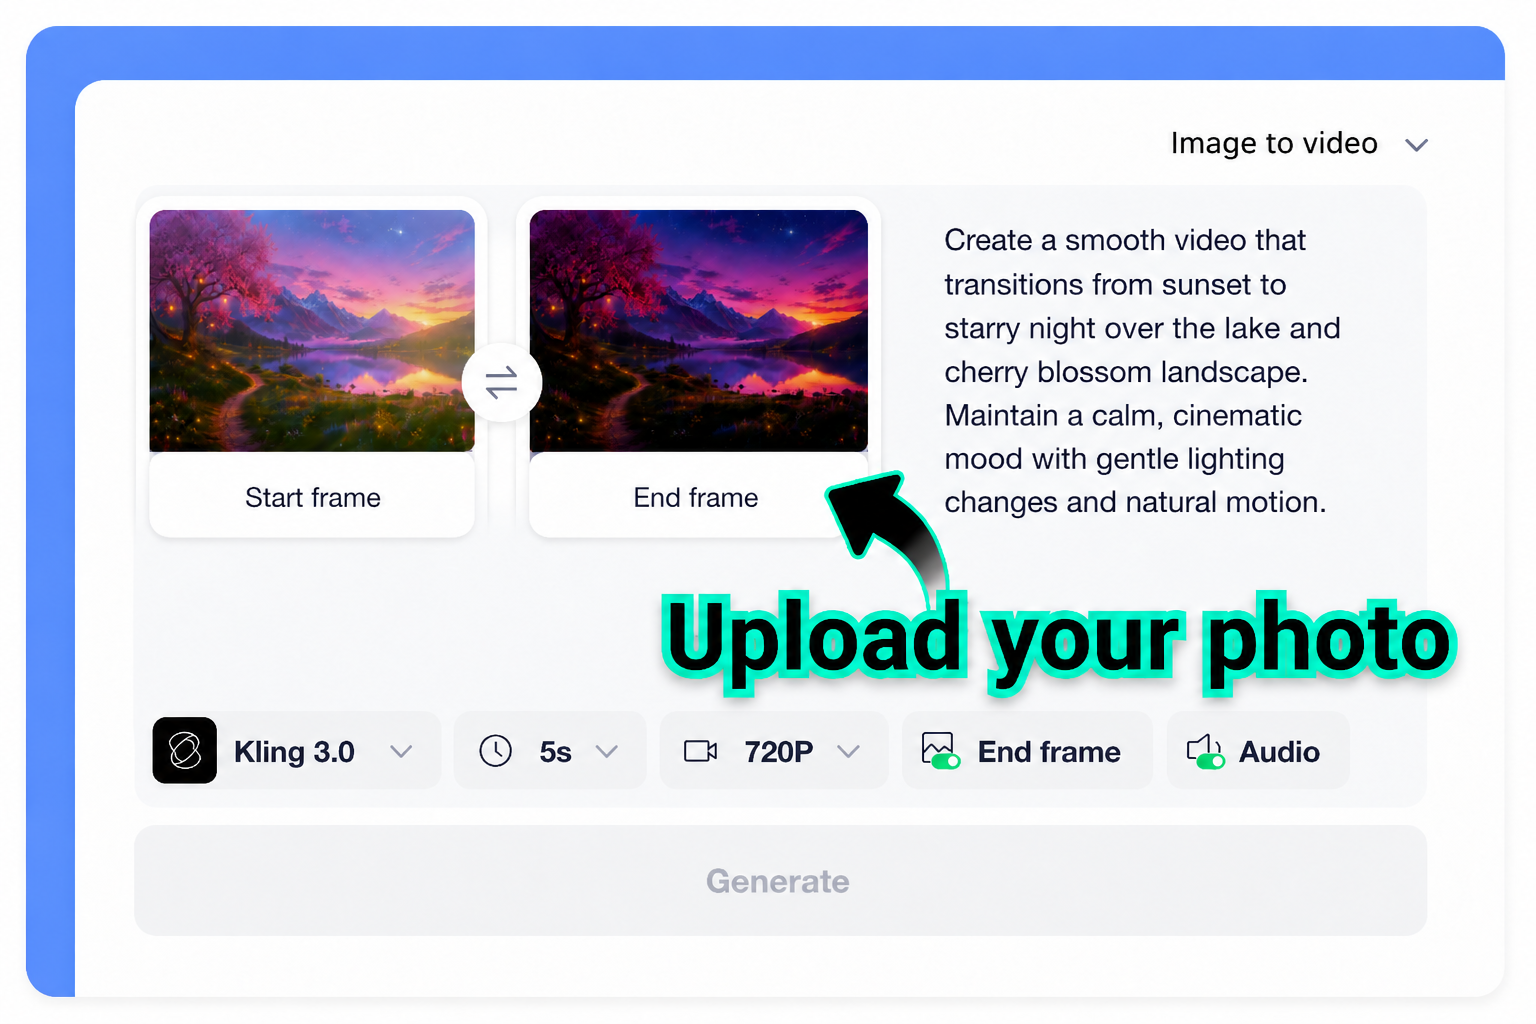
Step 1: Upload Your Start and End Frames
Start by uploading the image you want the video to begin with, then add the image you want it to end on. These two frames should feel connected. For example, use the same landscape at sunset and night, the same product before and after a reveal, or the same character in two poses.
The smoother your source images are, the smoother the AI video can become. Try to keep the subject, angle, and main composition consistent. If the first image is a wide landscape and the second is a close-up portrait, the model has to solve a much harder transition.
Step 2: Enter a Transition Prompt
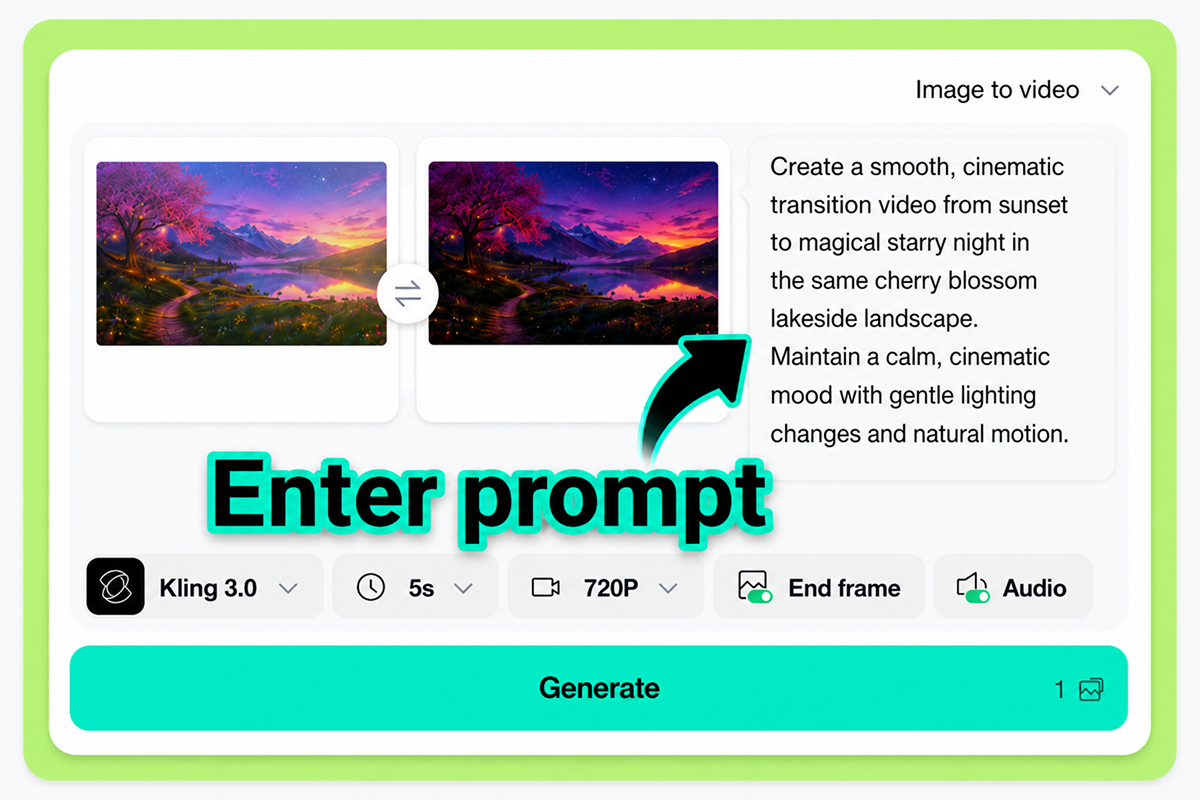
Next, write a prompt that explains how the video should move between the two frames. Do not only describe what is visible. Describe the transition itself: camera movement, pacing, lighting change, atmosphere, and the subject's action.
For example, you might write: Generate a smooth, cinematic transition video from the start frame to the end frame while maintaining the same cherry blossom lake landscape and gradually transitioning from warm sunset to a magical starry night. This prompt gives Kling both a visual goal and a mood.
Step 3: Choose Your Video Settings
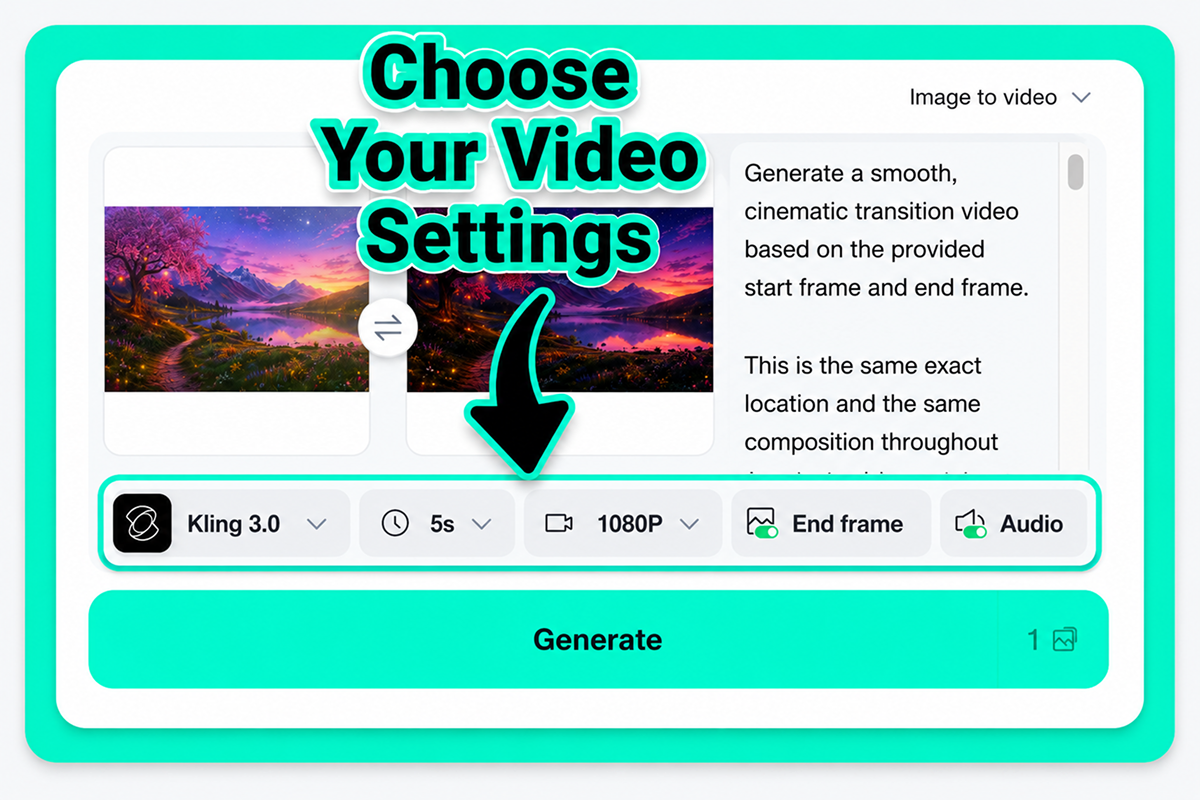
After the prompt is ready, choose your video settings. Select the Kling model available on the page, pick the duration, choose the output resolution, and make sure the end-frame option is enabled for this workflow. A short five-second clip is often enough for a clean transition, while higher resolution is better for polished social posts or marketing visuals.
Want a calm, elegant transition? Keep the duration short and the camera motion gentle. Want something more dramatic? Use stronger prompt language, such as "cinematic push-in," "slow orbit," "dramatic lighting change," or "smooth reveal."
Step 4: Generate and Download Your Video
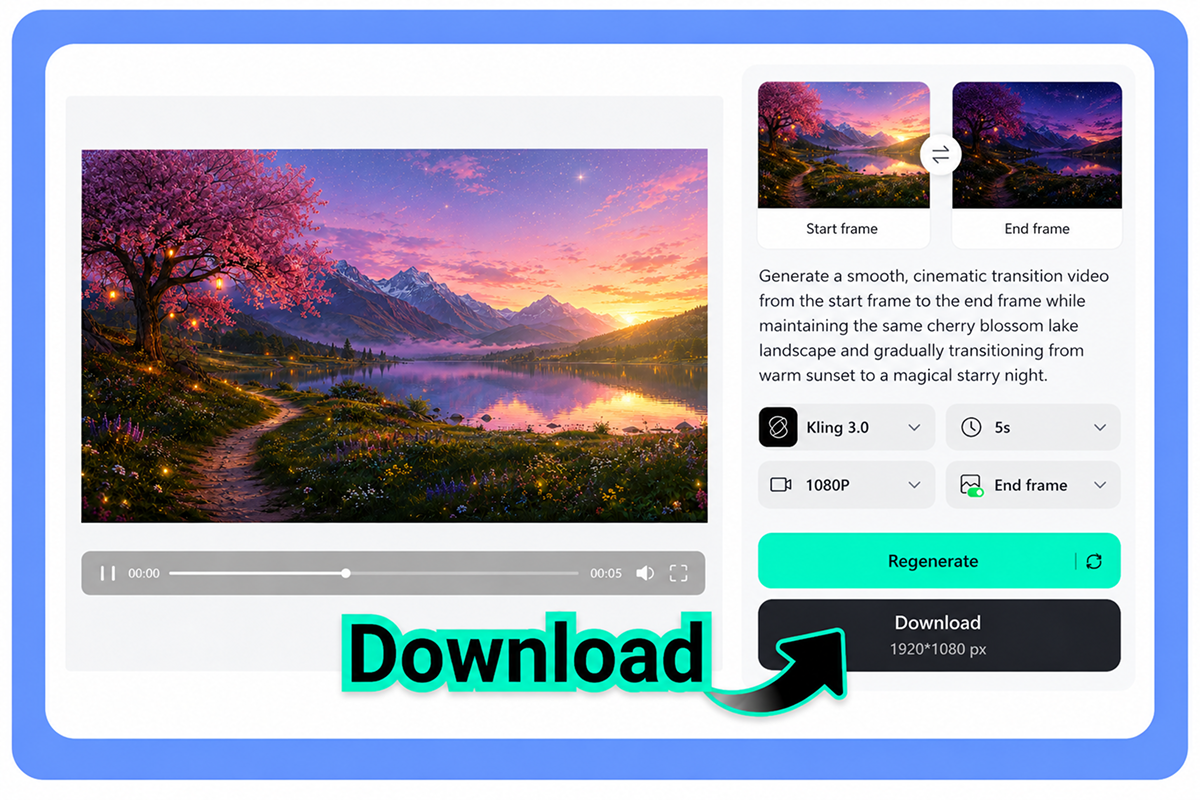
Click Generate and let insMind create the video. When the preview is ready, watch the whole clip before downloading. Check whether the motion feels natural, whether the subject stays stable, and whether the final frame lands close to your intended ending.
If the result is close but not perfect, adjust the prompt and regenerate. Small wording changes can make a big difference. For example, adding "same composition throughout" can help preserve the scene, while "gentle lighting changes" can prevent the transition from feeling too abrupt.
Best Use Cases for Start/End Frame Videos
So when should you choose start/end frame generation instead of regular image-to-video? Use it whenever the ending matters. If you need the video to arrive at a specific final pose, product state, environment, or lighting mood, two-frame control is usually the smarter choice.
| Use Case | Why It Works | Prompt Direction |
|---|---|---|
| Before-and-after reveals | The end frame locks the final transformation. | Create a smooth before-and-after reveal from the start frame to the end frame. Keep the same subject identity, same camera angle, and stable background. Use a gradual transformation, soft motion, and no sudden cuts. |
| Product videos | You can control the opening product shot and final hero shot. | Generate a premium product transition from the opening product frame to the final hero frame. Keep the product shape accurate, add a slow camera push-in, clean studio lighting, subtle reflections, and a smooth reveal of the final product state. |
| Landscape transitions | Lighting and mood can change from day to night, calm to dramatic, or season to season. | Transition from the start landscape to the end landscape with the same composition. Gradually shift the lighting, sky color, and atmosphere while keeping the horizon, mountains, water, or main scenery stable and cinematic. |
| Social media clips | Short videos need a strong ending frame for loops, Reels, Shorts, and TikTok posts. | Create a short smooth transition for Reels, Shorts, or TikTok. Keep the subject centered, make the first second clear, use mobile-friendly framing, and let the ending frame feel like a clean loop or strong final beat. |
For creators who focus on visual storytelling, this workflow is also a good way to plan motion without editing software. You can create a controlled AI transition effect from two images, then reuse the final clip in ads, posts, presentations, or campaign mockups.
Prompt Tips for Better Kling Start/End Frame Results
A good prompt does not need to be long, but it should be specific. Your start and end frames already tell Kling what the visual targets are. The prompt should explain the journey between them.
Describe the transition: Use phrases like "gradually changes," "smoothly transforms," "slowly reveals," or "seamlessly moves from start to end."
Name the camera motion: Try "slow push-in," "gentle pan," "cinematic orbit," "locked-off camera," or "subtle zoom."
Protect consistency: Add "same composition," "same subject identity," "stable background," or "consistent proportions" when needed.
Control the mood: Include lighting, color, pace, and atmosphere, such as "warm sunset," "dreamy night sky," or "clean product studio."
Avoid too many actions: One clear transition usually works better than asking for multiple scene changes in a short clip.
Here is a reusable prompt formula: Create a [duration] video that transitions from the start frame to the end frame, keeping [subject/composition] consistent, with [camera motion], [lighting change], and [mood/style].
If you want broader photo animation beyond a fixed ending, a regular image-to-video workflow may be enough. But when your story depends on the last frame, a Kling start/end frame video gives you more direction and a cleaner creative target.
FAQs About Kling AI Start/End Frame
What does start/end frame mean in AI video?
It means you provide a first frame and a final frame. The AI generates the motion between them so the video begins and ends at specific visual points.
What images work best for smooth AI transitions?
Use images with a similar subject, camera angle, and composition. The closer the two frames are visually, the easier it is for AI to create natural motion.
Can I use Kling Start/End Frame for product videos?
Yes. It works well for product reveals, before-and-after states, packaging shots, and short promotional clips where the final hero frame matters.
How long should a start/end frame video be?
For most smooth start/end frame transitions, 5 seconds is a strong default because it gives the AI enough time to move naturally without making the transformation feel slow. Use a shorter clip for simple motion, such as a product push-in or subtle lighting change. Choose a longer duration when the start and end frames are visually farther apart, such as day-to-night scenery, a pose change, or a more dramatic reveal.
Create Your Smooth AI Video Today
Start/end frame generation gives you more control over AI video storytelling. Instead of hoping the model lands on the right final image, you define both the beginning and the ending. Then your prompt guides the motion, mood, and camera behavior between them.
If you want smoother transitions for landscapes, products, social clips, animations, or visual experiments, try Kling AI Start/End Frame in insMind. Upload two frames, write a clear transition prompt, choose your settings, generate the clip, and download a video that feels planned from first frame to last.

Jayson Harrington
I am the Chief Editor of insMind. I provide tips and skills to help users design better photos with insMind, whether for e-commerce, social media, or any other use.
Keep reading

How to Use Seedance 2.5 for AI Videos
Learn how to use Seedance 2.5 for text-to-video and image-to-video, write stronger prompts, guide motion with references, and review results.

How to Make a Creepy Voice for Horror Content Step by Step
Learn how to make a creepy voice for horror videos, podcasts, and games with insMind.

How to Remove TikTok Watermark: 4 Easy Steps for Clean Videos
Learn how to remove TikTok watermark from videos in four practical steps with insMind.

Top 10 Seedance 2.5 Alternatives for AI Video in 2026
Compare top Seedance 2.5 alternatives and learn how to create AI videos with insMind.

Seedance 2.5 vs. MiniMax H3: Which AI Video Model Should You Use?
Compare Seedance 2.5 and MiniMax H3 for AI video creation.

30 Instagram Reels Prompts You Can Copy and Try
Copy-ready Instagram Reels prompts for products, fashion, creators, travel, food, pets, and lifestyle videos.

How to Write Instagram Reels Prompts for AI Videos
Learn to write Instagram Reels prompts for polished AI videos, product clips, creator posts, and lifestyle content.

30 TikTok Video Prompts You Can Copy and Try
Copy-ready TikTok video prompts for ads, creators, products, fashion, pets, travel, and more.

How to Create an AI Micro-drama: A Step-by-Step Guide
Learn how to create an AI micro-drama with insMind.

How to Create a Short Film Using AI in 2026
Learn how to create a short film using AI with insMind.

Instagram Reel Ads: Examples, Specs, Sizes, and Best Practices
Learn Instagram Reel ad specs, examples, safe zones, and best practices.

YouTube Ads Best Practices: How to Create Video Ads
Learn YouTube ads best practices and create video ads with insMind.

YouTube Channel Trailer Examples: 15 Inspiring Ideas for Your Channel
Explore YouTube channel trailer examples and create a polished trailer with insMind.

15 Best YouTube Ad Examples and Templates to Inspire Your Next Campaign
Explore YouTube ad examples and templates, then create video ads with insMind.

How to Make a Hype Video with AI: The Easy Guide
Learn how to make a hype video with AI using insMind.

Instagram Ad Templates for Feed, Stories, Reels, and Carousel Ads
Learn Instagram ad templates for Feed, Stories, Reels, and Carousel Ads.

Facebook Video Ad Specs: Sizes, Formats, and Lengths for 2026
Learn Facebook video ad specs, sizes, formats, and lengths for 2026, then make ad-ready videos with insMind fast.

How to Create Facebook Video Templates for Posts, Ads, Covers, and Live Video
Learn how to use Facebook video templates for posts, ads, covers, and live video with insMind.

Instagram Ad Examples: 15 Creative Ideas That Convert
Explore 15 Instagram ad examples and learn how to make them with insMind.

Instagram Ad Sizes and Specs: Complete 2026 Guide
Find Instagram ad sizes, specs, ratios, and dimensions for every major placement.

10+ Video Resume Examples with Scripts for Every Career Stage
Explore video resume examples and scripts, then create a polished video resume with insMind.

How to Make a Sports Hype Video with AI: A 4-Step Guide
Learn how to make a sports hype video with AI.

YouTube Ad Specs for 2026: Sizes, Formats, and Lengths
YouTube ad specs for sizes, formats, dimensions, and lengths, plus a four-step insMind workflow.

30 Best Grok Imagine Video Prompts You Can Copy and Try
Copy 30 Grok Imagine video prompts and learn how to write better prompts for creative AI videos.

50 Scroll-Stopping AI Brainrot Prompts for Viral Meme Videos
Copy 50 scroll-stopping AI brainrot prompts for chaotic meme videos.

How to Turn Any Photo into a Brainrot Meme Video
Learn how to turn any photo into a brainrot meme video with AI.

How to Make a Retirement Video with AI
Learn how to make a retirement video with AI.

How to Make Your Own Graduation Video from Photos with AI
Learn how to make a graduation video from photos with AI.

How to Make Your Own Outro Video
Learn how to make your own outro video with insMind.

Higgsfield vs Pollo AI: Which Video Platform Fits You?
Compare Higgsfield vs Pollo AI for cinematic control, model choice, ease of use, and pricing.

Pollo AI Review 2026: Features, Pros, Cons, and Verdict
Read our Pollo AI review for 2026 and explore its features, pricing, strengths, limitations, ideal users, and practical tips for better results.

How to Create Cute Baby Talking Videos from Photos
Learn how to create baby talking videos from photos with text, audio, and AI lip sync.

How to Make Your Own Talking Avatar with AI
Learn how to make your own talking avatar with AI from a portrait and script.

Seedance 2.0 Mini vs Seedance 2.0: Which Model Should You Use?
Compare Seedance 2.0 Mini and Seedance 2.0 for AI video creation.

How to Create Talking Animal Videos from Photos That Steal the Show
Learn how to create talking animal videos from photos with AI.

How to Turn a Character Image into a Consistent AI Video
Learn how to turn a character image into a consistent AI video with insMind.

10 Krea AI Alternatives for Creating and Editing AI Videos in 2026
Compare the best Krea AI alternatives for creating and editing AI videos, including insMind, Runway, Kling AI, Luma, Pika, VEED, and more.

Seedance 2.0 Mini Prompts to Copy: 20 Video Ideas
Copy Seedance 2.0 Mini prompts for cinematic AI videos with insMind.

Seedance 2.0 vs Seedance 2.5: What Changed?
Compare Seedance 2.0 and Seedance 2.5 with examples, prompts, and insMind workflow.

10 Best Pollo AI Alternatives for AI Video Creation in 2026
Compare the best Pollo AI alternatives for AI video creation, including insMind, Runway, Kling AI, Luma, Pika, VEED, and more.

How to Make an AI Video of Yourself That Actually Feels Like You
Create a realistic AI video of yourself from a photo and script.

How to Turn Old Photos into a Beautiful Tribute Video with AI
Turn old photos and memories into beautiful AI tribute videos.

How to Make a Daily Vlog with AI in Minutes
Create daily AI vlogs from photos, prompts, or ideas in minutes.

How to Create 2026 FIFA World Cup Highlights with AI
Create 2026 FIFA World Cup highlights, fan clips, and football videos with AI.

Best AI Video Extender for Creators: Top Tools Compared
Compare the best AI video extender tools for creators in 2026 and learn how to make short videos longer with insMind.

How to Edit YouTube Videos Faster with AI
Edit YouTube videos faster with AI background and style tools.

How to Create Training Videos with AI: A Complete Guide for Beginners
Create clear training videos from images and prompts with AI.

Create Product Reveal Videos with an AI Unboxing Video Maker
Learn how to create AI unboxing videos for product reveals, UGC, teasers, and ecommerce demos.

Create Smooth AI Video Transitions with Kling Start/End Frame
Learn how to create smooth AI video transitions with Kling Start/End Frame.

What Can You Choose for the Best InVideo Alternatives in 2026?
Compare the best InVideo alternatives and see why insMind is a strong AI video generator for creators and marketers.

10 Best Animaker Alternatives in 2026: New Trends in AI Video Creation
Compare the best Animaker alternatives for AI video creation, including free and open-source picks.

10 Best HeyGen Alternatives in 2026: Create AI Videos with More Freedom
Compare the best HeyGen alternatives for AI video creation, including free and open-source picks.

How to Make a Faceless YouTube Channel with AI
Make a faceless YouTube channel with AI tools, scripts, video ideas, and insMind.

Best CapCut Alternatives: 8 AI Video Editors Compared
Compare the best CapCut alternatives for iPhone, Android, PC, and AI video editing.

How Ecommerce Brands Replace Products in Videos with AI
Replace products in ecommerce videos with AI for ads, listings, and creative testing.

How to Change Video Background Without Green Screen: Step-by-Step Guide
Learn how to change video backgrounds without a green screen using simple AI editing steps.

How to Seamlessly Replace Objects in Videos with AI
Step-by-step guide on replace objects in videos with AI: how it works, best practices, and how to do it free with insMind.

How to Identify AI-Generated Videos: A Comprehensive Guide
Learn how to identify AI-generated videos using expert tips and insMind's tools for authenticity verification.

Can AI Really Edit Videos For You? A Deep Dive Into AI Video Editing
Discover how AI can edit videos effectively, using insMind and other top tools. Learn workflows, compare features, and explore future trends.

Crafting Viral Bigfoot AI Videos: A Step-by-Step Guide
Create viral Bigfoot AI videos with insMind. Learn how to optimize for TikTok and YouTube, avoid common mistakes, and more.

Discover the Versatility of Happy Horse 1.0 for AI Video Creation
Happy Horse 1.0 review explores AI video generation, integration with insMind, and practical applications for content creators.

Seedance 2.0 vs. Happy Horse 1.0: Which AI Video Generator Fits Your Needs?
Discover the differences between Seedance 2.0 and Happy Horse 1.0. Learn which AI video generator suits your needs best.

How to Make Educational Videos for Kids with AI (4 Easy Steps)
Write a structured script, choose model and audio, generate, and download—a step-by-step guide to making AI educational videos for kids with prompt templates.

Best AI Prompts for Explainer Videos (Proven Templates)
Four proven AI prompt templates for explainer videos—presenter, product demo, faceless brand, and tutorial—plus how to use insMind in 3 steps.

Best AI Explainer Video Generator for Business (2026 Guide)
Choose text-to-video or image-to-video, configure model and audio, generate and download—a complete 2026 guide to AI explainer videos for business with insMind.

Best Prompts for Wan 2.7: Multi-Shot Guide for Cinematic AI Video
Choose text or image mode, write scene-block prompts for Wan 2.7, set duration and audio, then download—plus 40+ language narrative tips.

How to Create Kids Videos with AI: A Parent-Friendly Guide
Upload art or start from text, write kid-safe prompts, pick Google Veo 3.1, generate and download—steps for parents and teachers.

From Script to Screen: How to Create Engaging Story Videos with AI Tools
Learn how to create story videos with AI: split scripts into scenes, optional reference images, generate clips in insMind, then merge. No pro editor required to start.

How to Make a Baby Dance Video with AI: Step-by-Step Guide
Turn a baby photo into a cute AI dance clip. Upload, write a motion prompt, pick model and duration, generate—no editing skills needed.

How to Make a Cat Dance Video with AI: Step-by-Step Guide
Turn a cat photo into a funny dance clip with AI image to video. Upload, write a motion prompt, generate, and download—no editing skills.

Best AI Tool for Pet Dance Videos (2026 Compared)
Compare top AI pet dance video tools with real screenshots, pros and cons, and a tested insMind image-to-video workflow plus copy-ready prompt.

Top 20 AI Fruit Video Prompts to Copy & Paste
Discover top AI fruit video prompts for creating engaging, trendy videos. Perfect for TikTok and other platforms, these prompts inspire creative content.

Funny AI Video Prompts That Work (Tested Examples)
Get 20+ tested funny AI video prompts that actually make people laugh. Copy-paste prompts for TikTok, Reels, and YouTube Shorts with step-by-step instructions.

Affordable AI Video Solutions for E-commerce Startups
Discover affordable AI video solutions for e-commerce startups. Learn about budget-friendly tools and maximize ROI with AI-generated content.

Transforming Marketing with AI Video Ads
Discover how AI video ads are transforming online marketing with personalized, efficient, and creative solutions. Learn techniques and examples.

Mastering Cinematic Ad Creation with Seedance 2.0
Create cinematic ads with Seedance 2.0, a powerful AI tool for video advertisements. Learn how to make stunning video ads using Seedance 2.0.

Mastering Viral Video Creation with Seedance 2.0
Discover how to create viral videos using Seedance 2.0 with tips, prompts, and insights on social media trends.

Close-Up Shot: Definition, Story Uses & Tighter Framing
What is a close-up shot? Definition, when to use tight framing for emotion and detail, and tips for shooting cleaner inserts on any camera.

YouTube Equipment for Beginners: Gear, AI Video & Your First Upload (2026)
Beginner YouTube equipment: priority order for mic, light, and camera; clear audio on a budget; phone vs dedicated camera; Shorts and 16:9 basics.

How to Create Anime Videos with AI (Step-by-Step Guide)
Learn how to create anime videos with AI step by step. Use text-to-video and image-to-video to generate stunning anime animations with insMind.

How to Make Viral Funny Videos with AI in 5 Minutes
Learn how to make viral funny videos with AI in minutes. Step-by-step guide to creating hilarious TikTok and Instagram clips using insMind AI funny video generator.

How to Create Talking Old Photo Videos with AI
Learn how to animate old photos with AI. Turn vintage portraits into talking videos with realistic motion using insMind free photo animation tool.

7 Best Sora 2 Alternatives for AI Video Generation in 2026
Discover the best Sora 2 alternatives for AI video generation. Compare insMind, Runway, Kling AI, Pika, and more to find the right tool for your needs.

AI Prompts for TikTok Video Generator: Complete Guide
Discover the best AI prompts for TikTok video generation. 20+ ready-to-use prompts plus a step-by-step guide to creating viral TikTok content with AI.

How to Upscale Anime Video to 4K with AI (Step-by-Step)
Learn how to upscale anime video to 4K using AI. Step-by-step guide to enhancing low-res anime with sharper lines and cleaner colors.

AI Marketing Video Generator: Create Promo Videos from Text
Learn how to turn text into professional marketing videos using AI. Step-by-step guide to creating promo videos in minutes.

Text-to-Video AI Ranked: Which Generator Wins in 2026?
Compare the 7 best text-to-video AI generators in 2026 including insMind, Sora 2, Runway, Kling AI, Pika, and more.

Animate Anime Images with AI: Turn Static Art into Dynamic Anime Videos
Learn how to animate anime images with AI. Turn static anime art into stunning animated videos easily.

How to Remove Kling Watermark from AI Videos
Explore the best ways to remove Kling AI watermark. Compare editing methods and discover watermark-free Kling generation options.

AI Video Editor: Edit Videos Instantly with Prompts
Use insMind AI Video Editor and prompts to edit videos, remove objects, change backgrounds and more.

Control the Narrative: Create Cinematic AI Videos with Start & End Frames
From start to finish, take control of AI video storytelling with Start & End Frames.

How to Create a Stranger Things Transition Video (Step-by-Step Guide)
Create a Stranger Things–style Upside Down transition with AI in just a few steps using insMind.

Transform Your Ideas: Generate Videos from Text Instantly
Turn text into videos in seconds with InsMind's AI—ideal for social media, ads, and presentations. No editing skills required.

Tralalero Tralala: How to Animate the Italian Shark Meme with AI Flair
Animate the viral “Tralalero Tralala” Italian Shark meme with AI for fun, shareable content.

Top TikTok Memes 2025: 'Tung Tung Tung Sahur' & Viral Trends You Can't Miss
2025 TikTok trends: AI-generated Italian Brainrot memes and creepy Tung Tung Tung Sahur dominate viral humor.