


Image-to-video demonstration from insMind.
A still image can suggest an entire scene. Making that scene move convincingly is harder: the subject has to stay recognizable, the camera has to behave, and the sound has to fit. This Vidu Q4 review looks at how the model approaches those challenges and what to check before spending credits on a clip.
Vidu Q4 puts image references and synchronized sound at the center of its appeal. That makes it interesting if you want to guide a scene with pictures rather than leave every visual choice to a text prompt. More control on paper, however, does not mean every first attempt will look right.
We will cover the published features, the limits worth keeping in mind, and the details to watch when reviewing a generated video. Later, you will find a separate tutorial for turning a photo into a video with insMind.
Table of Contents
Is Vidu Q4 Worth Trying?
Vidu Q4 is worth a look if you already have a clear visual idea and images to guide it. Its emphasis on image-based generation makes the starting picture especially important. You are choosing the appearance of the scene before asking the model to bring it to life.
The more useful question is whether it can create the particular shot you need. A beautiful frame is not enough if the face changes halfway through, an object disappears, or the camera moves in the wrong direction. Judge the whole clip rather than its most flattering moment.
Begin with a short, simple shot. Ask for one main action and a modest camera movement, then check whether the result follows both. This gives you a clearer starting point than a long prompt packed with competing ideas.
You can explore the same basic idea through an image to video tool on insMind. The model choices there are separate from the Vidu Q4 features discussed in this review.
What Is Vidu Q4?
Vidu Q4 is an AI video model from ShengShu Technology. Vidu introduced Q4 Preview in October 2026, so it is important to distinguish the preview from promises about a later full release. This article describes the public information available on November 4, 2026.
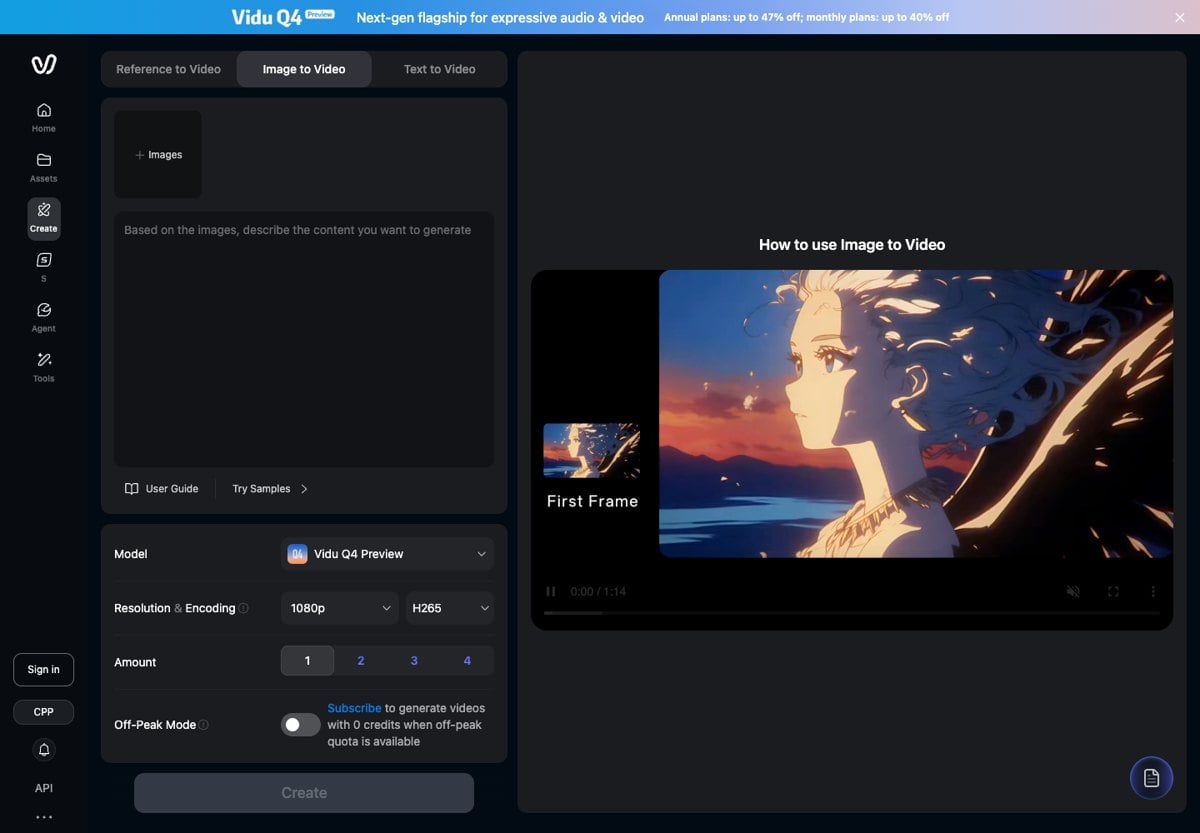
The official Q4 page describes two main options: image-to-video and reference-to-video. The first begins with one picture. The second accepts several visual references and optional voice references to guide the scene more closely.
Think of references as starting instructions, not a guarantee of perfect copying. They help tell the model what should appear, but you still need to inspect the movement, expressions, and transitions it creates.
It also matters where you open the model. A website offering Q4 can expose fewer settings than Vidu's own service. Check the actual upload limits, clip lengths, and export options on the screen you are using.
Vidu Q4 Review: Features That Matter
Image-to-Video and Reference Images
Vidu's official Q4 page lists support for up to 15 reference images. A reference can help establish a character, setting, or visual style. That is different from starting with a single frame and asking it to move.
More pictures do not automatically make an instruction clearer. Choose references that agree about the subject's appearance. Conflicting clothing, lighting, or backgrounds can leave you uncertain about which detail the model should keep.
Before uploading, decide what each picture contributes. Remove near-duplicates that add no useful information. Keep a clean copy of your source images so you can change the references without losing track of the starting point.
Motion and Camera Movement
Q4 is presented as a model for expressive movement and cinematic shots. Treat that as a reason to inspect motion carefully rather than assume every action will be smooth.
Play the result at its normal speed first. Does the action make sense? Then check the beginning, middle, and ending more closely. Look for sliding feet, changing hands, bending straight lines, and objects that drift away from where they should be.
Separate camera movement from subject movement in your prompt. If both are described vaguely, a busy-looking result can hide the fact that neither instruction was followed well. A small, clear movement is often easier to judge than constant action across the whole frame.
Native Audio and Voice References
Vidu describes Q4 as generating synchronized audio and visuals. Its official page also lists up to three voice references. These options concern the sound of the scene as well as what appears on screen.
Listen with headphones before you approve a clip. Check whether speech is understandable and whether sound effects happen at the right moment. A visually convincing movement can still feel wrong if the accompanying sound arrives too early or continues after the action stops.
Keep the sound request simple when you begin. Decide which sound matters most and whether dialogue is necessary. Adding several speakers and overlapping effects gives you more details to check after generation.
Clip Length and Resolution
The official Q4 page advertises clips up to 16 seconds and output up to 4K. Its image-to-video description lists 3–16 seconds, while reference-to-video can use a different supported range. Availability can vary by the service and settings you select.
Higher resolution means a larger picture, not automatically more convincing movement. Check the action before deciding that a bigger export is worth the extra cost. A shorter usable clip is more valuable than a longer one you cannot include in your edit.
Strengths and Limits to Keep in Mind
The appeal of Q4 is the combination of visual references, motion, and sound. You can communicate more of an idea before generating than you can with a short text description alone. The result still needs a careful watch and listen.
Pros
- Guide a scene with multiple image references
- Audio and video generation in the same model
- Short clips with several quality options
Cons
- Preview features can differ between services
- Moving subjects still need careful checking
- Retries can add to the credit cost
Do not judge consistency from a single close-up. Watch what happens when the subject turns, moves behind something, or appears after a cut. Details can stay stable in one part of a clip and change in another.
Keep realistic expectations about repeatability, too. A second attempt may solve one problem while introducing another. Save the version you like before changing the prompt so you can compare the complete clips instead of relying on memory.
If you want a wider choice of ways to make a clip, insMind's AI video generator is a separate place to explore. Check its current model menu rather than assuming every model mentioned in an article is available there.
What Should You Check Before Spending Credits?
Before generating, look at the credit charge for the selected length, quality, and audio options. A low advertised starting price may describe a different set of choices from the ones you want. Introductory offers should also be kept separate from ongoing costs.
Allow room for a few retries instead of budgeting for only one perfect take. Small fixes to movement or framing can require another generation. Keep your prompt and settings with each saved clip so you know what you changed.
Decide what would make the shot usable before you start. Is the face recognizable? Does the main action finish? Is the ending easy to cut? A clear answer helps you stop trying once you have a clip that works.
If you have no starting image and want to begin with words, a text to video tool is a different approach. It lets you describe the scene first rather than treating an image-based model as if it accepted the same inputs.
How to Turn a Photo into a Video with insMind
You can try image animation with insMind by uploading a picture and describing the movement. The steps below follow its Image to Video page. They are not instructions for accessing Vidu Q4 on insMind; use the model choices currently shown in the tool.
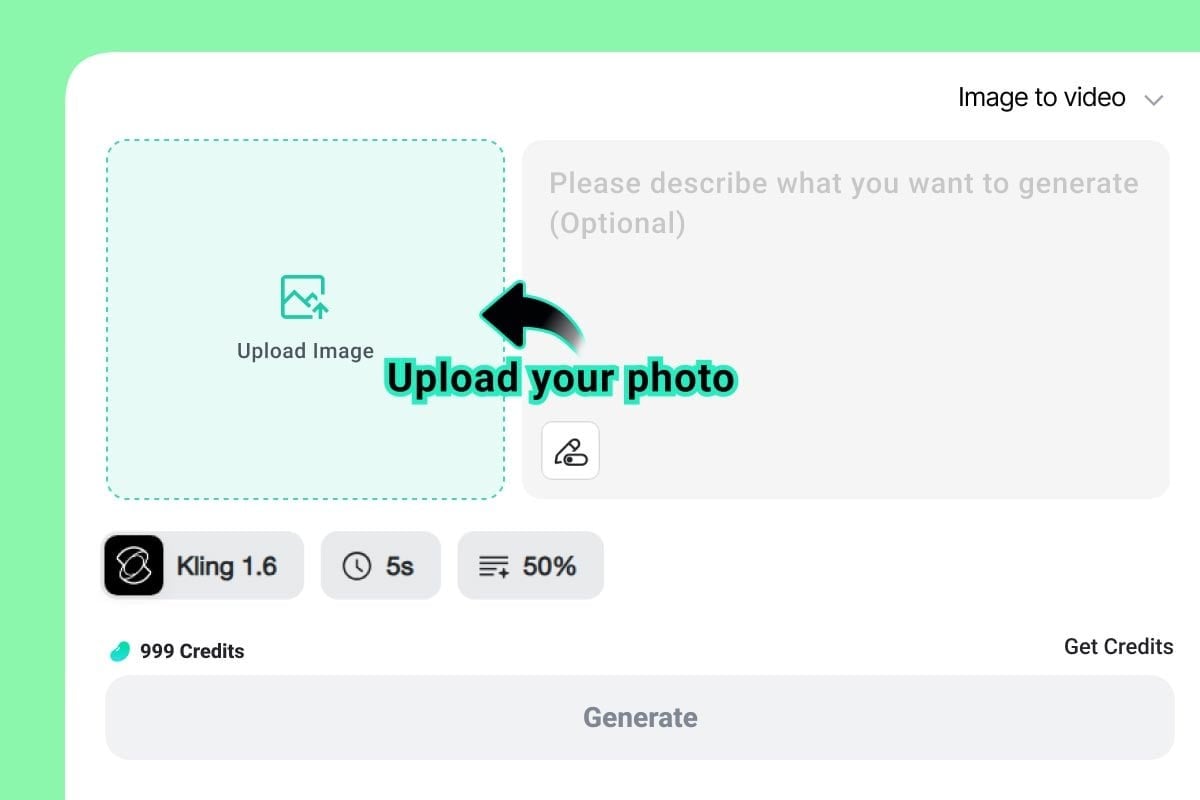
Step 1: Upload an Image
Open insMind Image to Video and choose a clear picture with one main subject. A sharp source makes it easier to see what changes once the picture starts moving. Avoid a heavily cropped face or an object already cut off at the edge.
Keep the original file nearby. If the video loses an important detail, you can compare it directly with the source rather than judging from memory.
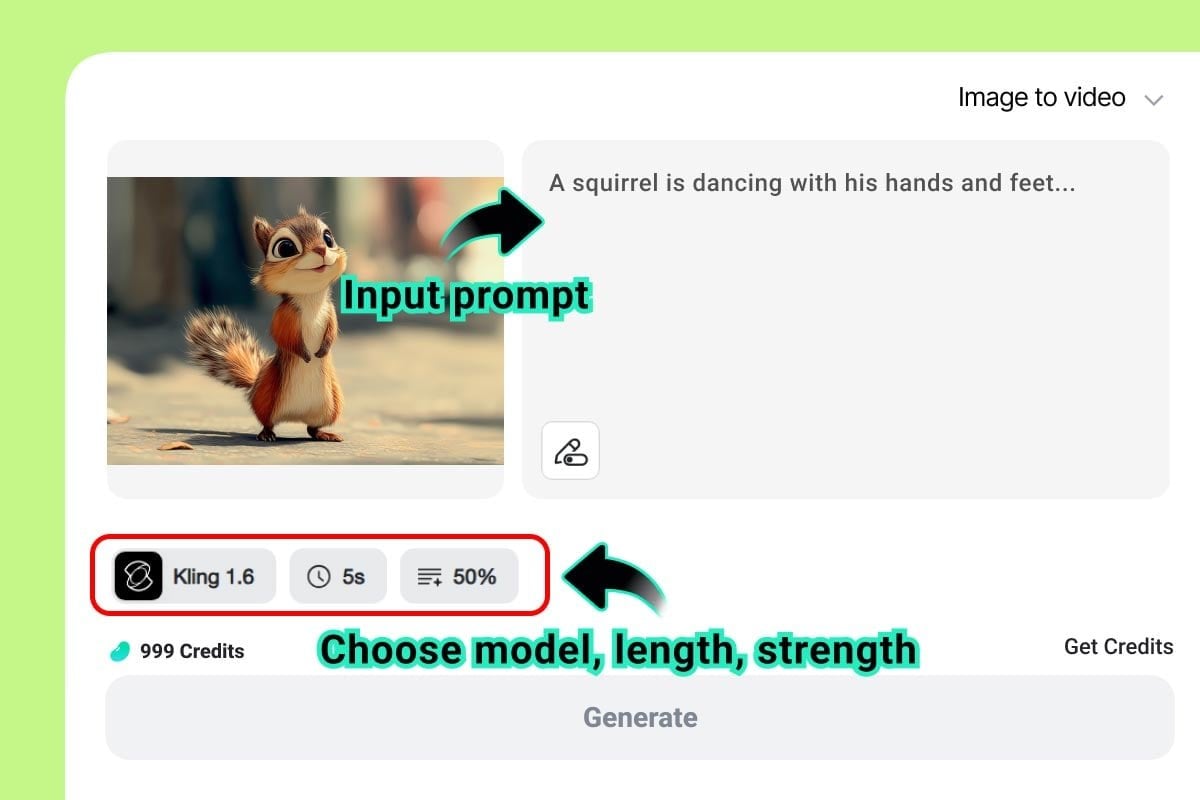
Step 2: Write a Motion Prompt
Describe what should move and how the camera should behave. Start with the main action, then add a short note about the pace or mood. Choose from the model and length settings shown on your screen.
Leave out instructions that fight each other. Asking for a fixed camera and a sweeping camera move in the same shot gives the tool an unclear target. Say which detail matters most and keep the first attempt simple.
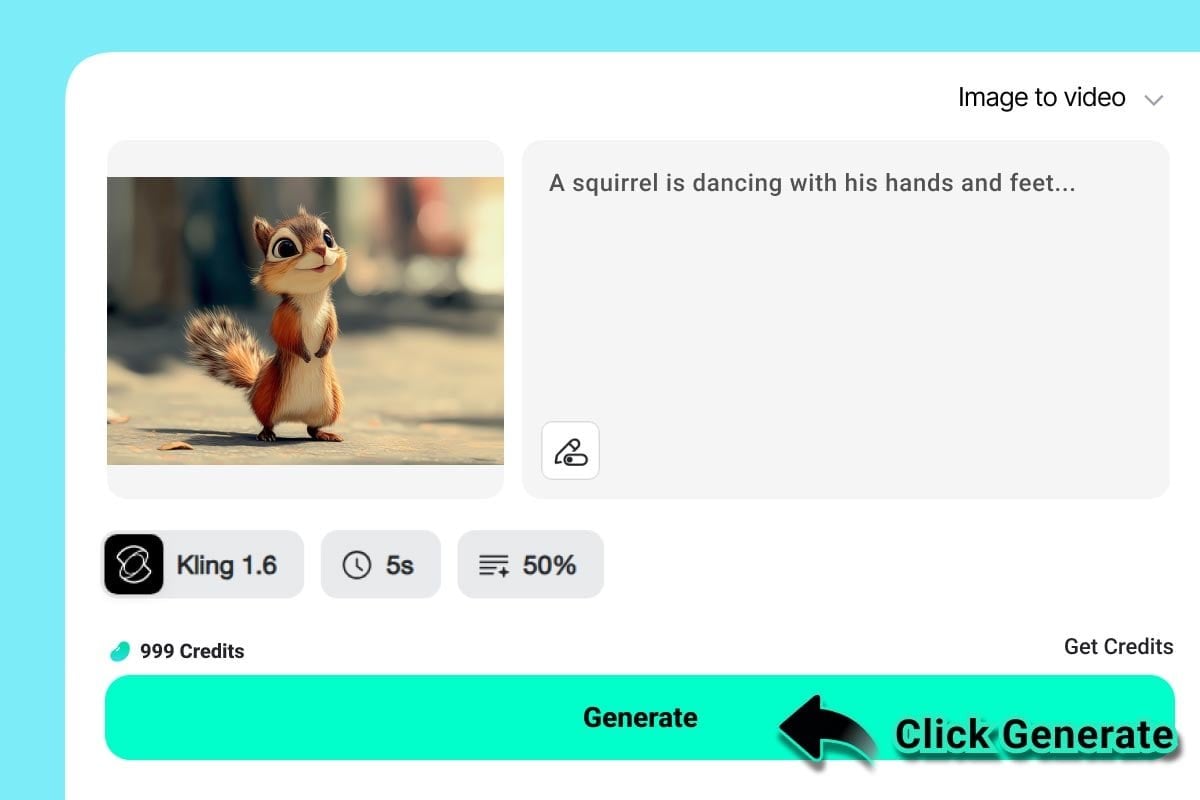
Step 3: Generate and Preview
Generate the clip, then watch it from start to finish. Check the subject's outline, background, and motion before trying a new version. Change one part of the prompt at a time so you can tell what improved.
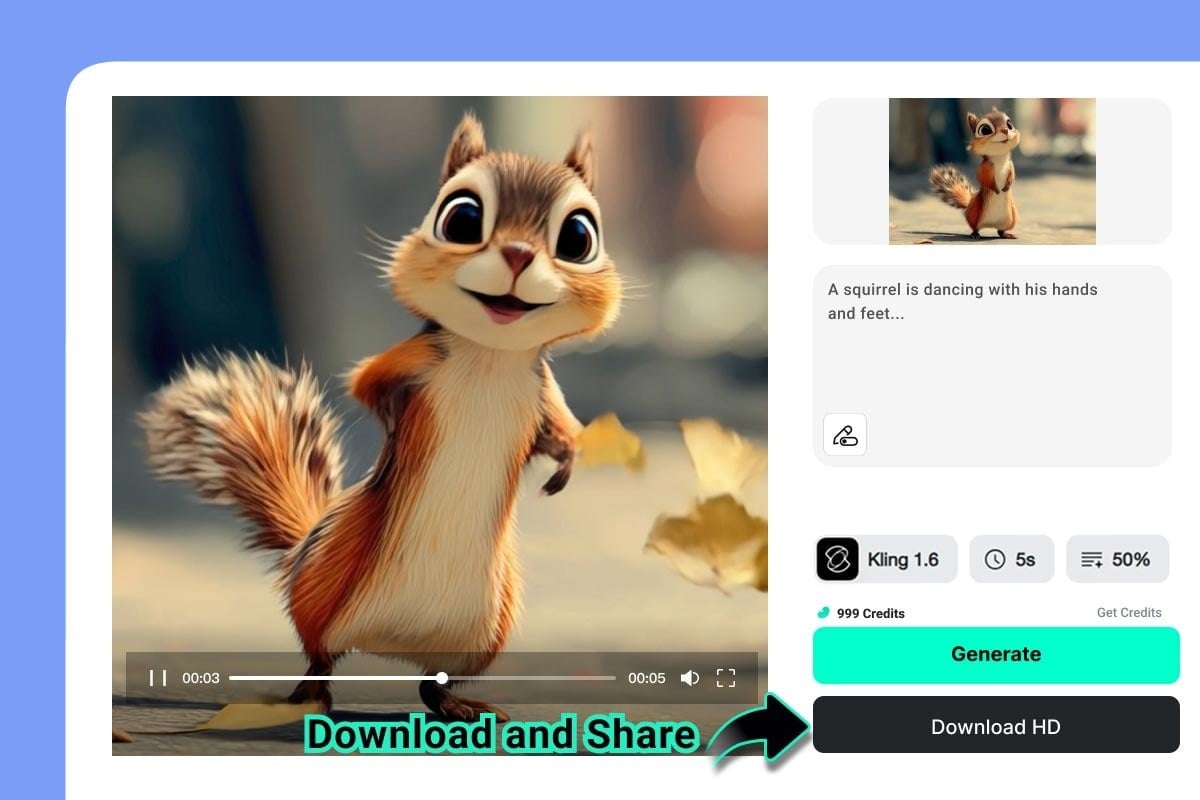
The landing-page pictures illustrate the basic controls; the available model names can change. Follow the options shown in the current tool rather than treating a screenshot as a fixed list.
Step 4: Download the Video
Save the version that looks right and check the downloaded file. Look at the first and last frames as well as the action in between. A clean ending makes a short clip easier to use without an abrupt cut.
If you need to guide both ends of a shot, you can also explore a start and end frame video. That is a separate control to consider when a single starting image leaves the ending too open.
Frequently Asked Questions
Is Vidu Q4 fully released?
Vidu introduced Q4 Preview in October 2026. Check the model label shown when you generate, because a preview and a later full release should not be treated as identical. Features can also differ between websites offering access.
Can Vidu Q4 generate sound?
Vidu's published Q4 information describes synchronized audio and video, with voice references available in its reference-based mode. Check which audio controls the service you are using exposes before you start.
Does a 4K export guarantee better motion?
No. Resolution describes the size of the video frame. You still need to check movement, timing, and subject consistency. Review the clip itself rather than relying on the resolution label.
Is Vidu Q4 available on insMind?
We could not confirm a Vidu Q4 option in insMind's public model list when preparing this article. The insMind tutorial above explains image-to-video creation with the models currently available there, not verified Q4 access.
Did this review independently test Q4's video quality?
No. It explains the published features and practical checks to use when trying the model. It does not claim measured generation speeds, a scored comparison, or results from a private set of test clips.
Final Verdict: Start with One Clear Shot
Vidu Q4 is an interesting choice when you want image references and sound to help shape a short scene. Its published options are promising, but the useful result is the clip that keeps your subject recognizable and carries out the action you asked for.
Start with one clear idea, keep the first prompt manageable, and review the whole video. If you want to begin with a photo you already have, open insMind Image to Video and try bringing that image to life.

Ryan Barnett
I'm a tech enthusiast and writer who loves exploring AI, digital tools, and the latest tech trends. I break down complex topics to make them simple and useful for everyone.
Keep reading

Artguru Review: Can It Make Blurry Photos Clearer?
Read this Artguru review to understand one-click photo enhancement, upscaling, and limits. Learn what to check and how to improve a photo with insMind.

Vidu Q4 Review: Features, Strengths, and What to Expect
Explore this Vidu Q4 review for image references, motion, native audio, and practical limits. Learn what to check and how to animate a photo with insMind.

ElevenLabs Review: Features, Pricing, and Is It Worth It?
Read our ElevenLabs review to explore AI voice features, pricing, strengths, and limits. Learn what to check before paying and create voice audio online.

4 Best AI Video Tools for Multilingual Ads in 2026
Compare AI tools for localized video ads, lip sync, dubbing, and new market-specific creatives, plus a practical review checklist.

5 Best AI Video Generators for Marketing in 2026
Compare five AI video generators for product ads, presenter videos, cinematic clips, and campaign testing, with practical selection tips.

Dreamina AI Review: How Good Is It for Images and Videos?
Is Dreamina AI any good? Explore its image generator, video creation, AI avatars, strengths, limitations, and alternatives in this detailed review.

Flova AI Review: Is It Really Worth Using in 2026?
Is Flova AI worth using? Explore its video creation features, character consistency, pricing, limitations, and the best alternative for creators.

Higgsfield AI Review: What I Saw in a Studio Slide Demo
A close look at Higgsfield's Studio Slide image-to-video example: what happens to the subject, where the effect works, and where I'd be careful.

5 Best AI Voice Generators in 2026: Free & Paid Picks
Compare five leading AI voice generators for creators, marketers, podcasts, videos, and business narration.

Best Text to Speech Tools: 8 Picks for Natural AI Voices
Compare eight text to speech tools for natural AI voices, videos, learning, and business projects.

7 Best AI Avatar Makers in 2026: Top Tools Compared
Compare seven AI avatar makers for business, social, anime, and 3D profiles.

Best AI Audio Generators: 7 Tools for Voice Content in 2026
Compare seven AI audio generators for voice content, creative projects, and developer workflows.

Grok Imagine vs Veo: Which One Should You Use in 2026?
Compare Grok Imagine and Veo to choose the right AI video model for your workflow.

New Seedance 2.1 and Mini: Better Quality, Lower Price
Seedance 2.1 and Seedance 2.0 Mini updates, pricing, and insMind workflow.

Best AI Video Color Correction Tools for Fast Video Enhancement
Compare AI video color correction tools and fix video color online.

Top AI Highlight Video Maker Tools to Create Stunning Clips in 2026
Compare AI highlight video maker tools and create stunning clips with AI.

Make Your Vacation Photos Move with an AI Travel Video Maker
Turn travel photos into cinematic AI videos, Reels, and vacation clips.

How to Get More YouTube Subscribers for Free
Learn how to get more YouTube subscribers on YouTube for free with small-channel tactics, Shorts, thumbnails, playlists, analytics, and AI workflows.

How to Get More Views on YouTube: A Practical 2026 Growth Strategy
Learn how to get more views on YouTube with a practical strategy for topics, titles, thumbnails, Shorts, retention, analytics, and safer growth.

Best AI UGC Video Generator for TikTok Ads: Boost Engagement Fast
Step-by-step guide on Best AI UGC Video Generator for TikTok Ads: how it works, best practices, and how to do it free with insMind.

Seedance 2.0 vs Veo 3.1: Which AI Animation Tool Is Right for You?
Explore the strengths of Seedance 2.0 vs Veo 3.1 in animation, focusing on features, performance, and user experience.

Top 10 AI Meme Video Generators in 2026 (Free and Paid)
Compare the top 10 AI meme video generators for TikTok, Instagram Reels, and YouTube Shorts. Find the best free and paid tools to create viral meme videos with AI.

Best Seedance 2.0 Prompts: 5 Copy-Paste Examples for AI Video Creation
Discover 5 Seedance 2.0 prompt examples and learn how to create smoother, more cinematic AI videos with better control.

Seedance 2.0 Alternatives: 8 AI Video Models Worth Trying in 2026
Explore 8 Seedance 2.0 alternatives and learn how to choose the right AI video model for social content, ads, and storytelling.

Top 10 ID Card Maker Prompts to Create ID Cards Online
Discover the trending prompts to generate ID card photos.

How to Go Linve in Instagram (The Ultimate Guide in 2026)
Discover exactly how to do live video instagram broadcasts. We cover the setup steps, engagement tips, and how to use insMind AI to create stunning videos.

5 Hottest Nano Banana 2 Prompts to Create Stunning AI Images
Looking for the best Nano Banana 2 prompts? Discover 5 trending prompts and generate stunning AI images using insMind’s Nano Banana 2 AI Image Generator.

Nano Banana 2 vs Nano Banana Pro: Which AI Image Model Should You Use?
Discover the key differences between Nano Banana 2 and Nano Banana Pro. Compare features, pricing, and best use cases for each model.

AI Attractiveness Test: Discover Your Beauty Score with AI
Curious about your beauty score? Try the AI attractiveness test to analyze facial symmetry and proportions instantly using insMind’s AI tool.

Mocking SpongeBob Meme: Meaning, Origin, and How to Make It
Discover what the Mocking SpongeBob meme means, where it came from, why it went viral, and how to make your own version step by step.

Seedance 2.0 Review: Multimodal Control and Real-World Testing in 2026
Seedance 2.0 review with feature breakdown, pricing overview, and side-by-side comparison with Kling, Sora, Veo, and Wan AI video models.

Seedance 2.0 vs Kling 3.0: Which AI Video Generator Wins?
Seedance 2.0 or Kling 3.0 ? We compare both AI video generators on features, speed, and quality so you can pick the right model fast.

Is PixVerse AI Worth Using in 2026? Full Review, Pros & Cons Explained
An in-depth PixVerse AI review covering features, strengths, limitations, and how to use PixVerse on insMind for lower cost and more models.

30 Funny Text Meme Ideas That Will Make Anyone Laugh Instantly
Introduce 30 funny text meme ideas and learn how to generate meme images with insMind AI Image Generator.

Top 10 AI Discord Banner Ideas for Personalized Profiles
Your Discord banner sets the first impression. With AI Discord banner generator, you can create personalized banners in minutes.

Top 10 Discord Avatar Maker Ideas with AI
Your Discord profile picture is your personality. With AI avatar makers, you can create a unique avatar in seconds.

Top 10 Realistic Celebrity Selfie AI Prompts
Discover how celebrity AI image generators create realistic selfies. Learn how prompts turn photos into convincing celebrity-style images fast and easily.

Top 5 Local/Open-Source AI Image Generators in 2026
Discover the top 5 local/open-source AI image generators in 2026.

What Are Agent Skills? Everything You Need to Know
Introduce what are agent skills and how agent skills improve productivity.

Top 10 AI Collage Prompts for 3-Grid & 9-Grid Photos
Create professional 3-Grid and 9-Grid photo collages in seconds with our free AI generator. Upload images and let AI handle layout perfectly.

Top 10 Best AI Animation Tools in 2026 for Creators and Marketers
Discover the top AI animation tools in 2026, including text-to-video, image-to-video, and full AI video generators.

Top 10 AI Christmas Card Ideas for Custom Holiday Cards
Explore 10 AI-powered Christmas card ideas to create personalized holiday cards that feel festive, thoughtful, and easy to share with everyone.

Top 10 Christmas Elf AI Transformations to Try This Season
Create fun Christmas elf photos with AI. Turn yourself, family, kids, or pets into playful elves and share festive portraits this holiday season.

Top 10 Turn Me Into a Santa Ideas to Try This Christmas
Use AI to turn yourself into Santa this Christmas and create festive photos with a AI Santa Filter that are perfect for sharing, cards, and holiday laughs.

OpenArt Review: Honest Experience Using an AI Image Creator
Learn everything about OpenArt AI image generator in this article.

Kling O1 Prompt Bank: Everything you need to know
Learn everything about the Kling O1 Prompt Bank, including tips, examples, and AI video prompts.

Kling 2.6 Overview: Features, Benefits, and How to Use it Professionally
Explore Kling 2.6, the native audio-visual AI video model that creates videos with voice and sound in one seamless workflow.

50+ Hottest Nano Banana Pro Prompts for Viral Image Effects
Go through the guide to uncover the hottest list of Nano Banana Pro prompts to copy and use them as guided.

Nano Banana Pro vs. Seedream 4.0: How to Choose the Better One
Nano Banana 2 vs. Seedream 4.0? The clash between innovation and intelligence is outlined in the article below, with key differences and a guide on how to use it.

Black Friday Memes: The Funniest Internet Trend Taking Over Every Year
Explore the rise of Black Friday memes and learn how to create your own viral, funny posts with AI.

Zootopia Selfie: Turn Yourself into a Zootopia Character with AI
Transform your photo into a fun, animated Zootopia-style character instantly with AI.

Top 5 AI Video Generators in 2025: Create Stunning Videos with AI
Explore the best AI video generators of 2025 to create stunning, high-quality videos effortlessly. Learn more on insMind!

Top 5 Best Sora 2 AI Alternatives in 2025
Are you looking for some reliable Sora 2 AI alternatives? Here is a detailed guide with top 5 best Sora AI alternatives you can try in 2025.

Top Luma AI Alternatives for Video Creation
Are you searching for some reliable Luma AI alternatives that can generate high-quality AI videos? Here is a detailed guide that can help you.

Top 5 Hailuo AI Alternatives For Quality Video Generation
In this article, we'll provide you with the top 5 options for the best Hailuo AI Alternative so you can create your videos more quickly, easily, and with better quality.

Top 5 Veo 3 Alternatives: Best AI Video Generators You Can Try
Are you searching for the Veo 3 alternatives? Here is a guide with top 5 Veo 3 alternatives you can consider using according to your needs and budget.

Top 80 Attitude Captions for Instagram: Express your Personality
This article provides 80 powerful attitude captions to boost your Instagram engagement.

Nano Banana Tested, Complete Gemini 2.5 Flash Image Review
I have tested Nano Banana, and its AI image edits feel magical. Its realistic edits with consistency prove why it's the future of AI creativity.

Top 10 PixVerse AI Alternatives: Turn Image & Text to Amazing Videos
Top PixVerse AI alternatives for creating amazing videos from text or images, with insMind as the top pick.

Top 10 Kling AI Alternatives for Smarter AI Video Generation
Top 10 Kling AI alternatives for smarter, faster, and more accessible AI video generation.

Top 10 Best AI Art Generators in 2025: Features, Tips & Use Cases
Discover the best AI art generator tools for 2025

I Tested Higgsfield AI, Here is My Real Opinion
Higgsfield AI promises cinematic-level image and video creation. Read my hands-on review, test results, and verdict before you try it yourself.

Top 10 Most Popular Halloween PFP Ideas in 2025
Looking for an aesthetic Halloween PFP? Find the best spooky and fun ideas, plus tips to design eye‑catching profile pictures for the 2025 Halloween season.

5 Best Kling AI Alternatives for Fast HD Video Creation
Discover the best Kling AI alternative options for 2025. Ideal for creators needing fast, HD video generation without the hassle, and affordable for everyone.

Top 10 Female Anime Characters You Need to Know About
Explore the top 10 female anime characters, their charm, and learn how to turn yourself into a cute anime drawing with a reliable AI-powered tool.

Understand the Starbucks Logo Meaning and Get Inspired
If you don’t understand Starbucks logo meaning, read this article. It provides how it came to be and what makes it stand out from the other coffees.

Why a Red Logo Could Be the Perfect Choice for Your Brand?
If you are looking to expand your brand name, choose a red logo. This article highlights the different reasons why companies should go for it, and more.

Top 10 Trending Family Tattoo Ideas in 2025
Want to immortalize your family name or moments, but can't decide which one to get? Go through the top 10 family tattoo ideas in this article.

What Color is Mauve - Everything You Need to Know about Mauve
Learn what color mauve really is, its hex code, meaning, and how to style it.

10 Customizable Aesthetic Phone Wallpaper Ideas in 2025
Looking to upgrade your iPhone wallpaper aesthetic? Explore 10 customizable design ideas and learn how to create your stunning backgrounds using easy tools.

Best 10 Coverup Tattoo Ideas to Hide Regret with Style
Looking to hide or transform an old tattoo? Explore creative cover-up tattoo ideas, from floral designs to AI-powered previews, that help you turn ink into art.

Top 5 AI Pixel Art Generators in 2025: Instantly Make Pixel Art Online
Generate pixel art instantly with AI in 2025! Top 5 tools compared—insMind leads for speed and creativity.

Top 8 Kawaii Chibi Character Makers: Create Your Avatars
Are you looking for a good chibi maker to create the cutest avatars or stickers? Read this article to find the best 8 chibi avatar makers.

Top 5 AI Simpsons Character Generators: Transform Your Face into Yellow Toon Style
AI-powered Simpsons avatar maker: Instantly cartoonize any photo in classic yellow style!

Top 6 AI Tattoo Removal Tools: Erase Tattoos from Photos
Easily remove tattoos from any photo with the best AI tools. Fast, realistic, and perfect for clean edits.

Top 5 AI Baby Podcast Generators in 2025 [Reviewed & Tested]
Discover the top 5 AI Baby Podcast generators and learn how they generate engaging content. Also, understand why this trend is all over social media.

10 Slimming Hairstyles for Round Faces—Try Them with AI!
Instantly try 10 slimming hairstyles for round faces using insMind's free AI tools. Discover flattering cuts that enhance your natural features.

Wolfcut: Details to Uncover Before You Decide a New Look
Choosing a Wolfcut becomes easier with face-based previews in real-time. Visualize your new hairstyle clearly and save results directly to your device.

20 Unique Trending Prom Hairstyles in 2025
Are you struggling to find the perfect prom hairstyle? Read this article and discover the top 20 prom hairstyles and trends that make a unique personality.

Embrace the Y3K Fashion with AI Tools
Discover Y3K fashion trends and create futuristic outfits with AI tools through any means of key aesthetic elements.

Virtual Hair Try-On: 5 Must-Have Styles of 2025 You Can Test Now
Preview 2025's trending hairstyles with virtual try-on tools before your salon visit. Try new looks online easily.

10 Best Baby Face Generators Online Free for Realistic Results
Explore lifelike baby predictions with best baby face generator online free. Upload photos, blend features, and simply see a glimpse of your future baby.

Try Before You Dye: Best Hair Color Try-On Tools in 2025
Discover top virtual hair color try-on apps for 2025. Find your perfect shade online—easy, fun, and free.

Top 5 Free Alternatives to GPT 4o Image Generation
Discover the top 5 free alternatives to GPT 4o for AI image generation. Explore tools to boost your creativity.

Top 10 Hair Color Trends 2025 for Men and Women
Discover 2025 hair color trends from dusty to bright skin tones. It is suitable for every hairstyle and season and perfect to refresh your look this year.

Top 25 Hair Trends of 2025: Styles to Look Out For!
Hair trends are always changing, and in 2025, fashion is at an all-time high. Here are the top 25 hair trends to study for the best and most unique look.

Top Ghibli AI Prompts to Create Fantasy-Style Images
Use these Ghibli-style prompts to create magical forests, cute characters, and fantasy cities. Learn how to use the insMind tool to bring your ideas to life.

Best Ghibli-Style Filters You Need to Try in 2025
Discover the best Studio Ghibli filter styles for photos and videos in 2025. Transform your content with dreamy, anime-inspired effects using insMind.

Ghibli vs. Pixar AI Styles: Find Out the Differences
Discover the trending Ghibli vs. Pixar AI art transformation, their differences, and how to use AI tools for the perfect transformation.

Top 5 Ghibli Style Image Generators in 2025
Looking for the best Ghibli AI image generator? We tested and reviewed the top 5 options—complete with pros and cons. Read on to find your perfect match!

Best Passport Photo Makers in 2025: Create Perfect ID Photos Online
Discover the best online passport photo makers of 2025. Create perfect ID photos quickly and easily.

5 Best Hairstyle Apps to Virtually Try New Haircuts and Colors
Want to try a new haircut without the risk? Discover the top 5 hairstyle apps that let you experiment with different haircuts, colors, and styles.

Top 5 Hair Color Apps to Try on Your New Look Virtually
Explore the top 5 hair color apps that let to try different shades and styles online to experiment with your look before making it a permanent change.

The Ultimate Guide to the Best 5 Discord Avatar Makers
Can't seem to find the idea avatar maker online? This article will offer the top 5 Discord avatar makers to make customized profile images on servers.

Pixelcut vs. Photoroom: Which One is Better?
Wondering which AI image editing tool is better? Compare Pixelcut vs. Photoroom in features, pricing, and find the best option for you.

Complete Walkthrough of Fooocus vs. Stable Diffusion
What is the best generator for an artist or professional? Read this article to find the best by looking at the Fooocus vs. Stable Diffusion comparison.

AIEase Review: Pros, Cons & A Smarter AI Editing Alternative
Go through an ultimate review to discover the pros, cons, and features of AIEase, and explore an AI-powered photo editor as a great alternative.

20+ Unique Valentine's Day Photo Ideas for Cherished Memories
Are you looking for Valentine's Day photo ideas to surprise your loved one? Explore this guide to learn the best options for crafting high-end images.

Unique Valentine's Day Gift Ideas for Creative Ways to Celebrate
Explore unique Valentine's Day gift ideas with insMind's unique digital gifts. Create custom gifts in just a few steps that will ultimately show you care.

Lemon8 vs. TikTok - What're the Differences?
Explore the Lemon8 vs. TikTok comparison, as well as their features and integration. Also, learn how an advanced editor can enhance your content creation.

A Must - Read! Lemon8 vs. Pinterest, Which One Is More Suitable for Your Content Sharing?
Which one is better, Lemon8 vs. Pinterest? Explore which platform is best for your sharing needs, find out the best photo editor for your content creation.

What is REDnote (Xiaohongshu) and Why Are TikTok Users Downloading It
Learn why TikTokers are going to Xiaohongshu, the alternative platform, as the ban approaches. Also, learn about a useful tool to create engaging images.

Discord Profile Picture Size and How to Make The Perfect Discord Profile Picture
Do you want to have a unique presence on Discord? Read this article and learn about the picture size and ways to create the best Discord profile picture.

Redbubble vs. Esty, Which Platform is Better for Sale
Which is right for you, Redbubble or Etsy? Explore the following informative article, and sort yourself related to Redbubble vs. Etsy queries.

Top 5 AI-Powered Christmas Card Maker
Discover 5 leading Christmas card makers to surprise your loved ones. Also, compare them regarding price, accuracy, and other terms to pick the best.

Top 10 Christmas Cards Ideas, Templates, and Wishes
Do you want to create the perfect Christmas card for your family and friends? Read this article to find the best 10 Christmas card ideas to get started.

An In-Depth Review of Reface AI: Features,Pricing,Prons &Cons
Are you thinking, "Is Reface AI worth the investment?" Check the article below, explore the expertise of Reface AI, and then find a cost-free solution.

Top 10 Profile Picture Ideas for Facebook, Instagram, Discord, TikTok and More
How can profile pictures be made more engaging? Run through the article below and reveal endless ideas for profile pictures to use on social media platforms.

Top 10 Creative Poster Ideas (With Ready-to-Use Templates)
Are you thinking about enhancing your poster design? Read the following article and expand your knowledge about top creative poster ideas.

How to Use Bing Image Creator to Uplift Your Creative Vision
Have you heard about Bing Image Creator? Read this article to learn how you can create stunning images using Microsoft Bing AI art generator.

Top 5 AI Clothing Model Tools to Save Your Cost and Time
Do you want to build your clothing brand but don't have the budget? Read this article to explore the best 5 AI clothing model tools and boost your brand.

5 Best Easy-to-use Online Photoshop Alternatives
Find Photoshop too complex to use? Discover the best free online alternatives to meet all your photo editing needs.

A Complete Overview of Lemon8: Features, Guide, & Insights into Its Popularity
What is Lemon8? How to create engaging posts on Lemon8? Read the article and learn everything about Lemon8, including its features, audience, guide, etc.

How to Effectively Use AI Generative Fill in Photoshop
Are you looking to discover the use of Photoshop AI generative fill? This article explores Photoshop AI in detail and its best alternative.

ThredUP vs. Poshmark - Which One is a Better E-Commerce Platform
Learn about the two best e-Commerce stores, ThredUP and Poshmark. This article will provide a complete guide on ThredUP vs. Poshmark.

Identifying the Differences Between Depop vs. Poshmark
Do you need to find the best e-Commerce store for your fashion needs? Go through this detailed guide on Depop vs. Poshmark to identify one.

What is AI Yearbook and How to Make One with AI
Are you looking to recreate your yearbook photos? Then, read this article to discover the best AI yearbook generators with comprehensive steps.

eBay Image Size and Requirements 2025 New Rules
Get informed about eBay image size and requirements for 2025 with our guide. Follow the new rules to improve your listings and attract more buyers effectively.

Finding the 10 Best Free Midjourney Alternatives - Complete Guide
Midjourney boasts the best-in-class AI integration. However, it is not the only application that offers realistic AI image generation. This article is ready to explore the ten best Midjourney alternatives.

Exploring the 10 Best AI Photo Editors for Your Needs [2025]
Want to make your images visually attractive? Read this guide to learn about the best AI photo editors providing features to create high-quality content.

The Best 5 Fotor Alternatives - The Ultimate List 2025
Looking for Fotor alternatives? This article will explore the five best applications to replace Fotor. Each application is unique in its features and performance. Compare our top picks in the comparison chart!

Top 5 AI Tools for Graphic Design
Do you want to uncover the best AI tool for designing? Discover the top 5 AI tools for graphic design that can boost creativity and streamline the design.

Facebook Profile Picture Size Guide: Make the Most of it
Optimize your online presence with insMind's Facebook Profile Picture Resizer. This guide ensures your picture is perfectly sized for maximum impact and engagement.

Top 100 Sad Bio Ideas for Instagram You Must Try
Discover 100 poignant Instagram bio ideas for a touch of melancholy. Express your deepest emotions with these creative and relatable snippets.

Top 5 Tools To Mix and Blend Images With AI Online
Looking for the right tool to mix multiple images with AI? Read this article to learn about the top 5 photo mixers and how to use them efficiently.

Free Online WhatsApp DP Converter without Losing Quality
Discover the best free online WhatsApp DP converter that preserves image quality, and learn how to convert your profile pictures with this top-rated tool.

The 5 Best Free AI Image Upscaler of 2025 - Complete Review
Finding the Free AI image upscaler? Our top pick is insMind- the AI genius for image enhancement. Fix your photos with AI within minutes.

50+ Best Birthday Wishes/Quotes/Messages for Grandson
Discover heartfelt and creative birthday wishes for your grandson by reading this article. You will find over 50 unique messages to make his special day memorable.

Say Your Love: 50+ Daughter-in-Law Birthday Wishes
Are you looking for heartfelt daughter-in-law birthday wishes? From sweet to funny, find the perfect message to celebrate her special day.

Uncover the 100+ AI Image Prompt Ideas for AI Art
Want to generate AI images for your campaign? Find out how makers use AI to create stunning campaigns with 100+ AI generator image prompt ideas for free.

Ultimate AI Image Generator Without Login: 3 Must-Try Tools
Do you want to create stunning visuals using advanced AI? Discover the best AI image generator without login or restrictions in this guide.

10 Twitter Bio Ideas in 2025 with Examples
Powerful Twitter bios turn account visitors into followers, and eventually followers into sales. Check out these resources and tips we've compiled to learn how to create an effective and interesting Twitter profile.

100+ Facebook Bio Ideas For You
Having a bio for Facebook is crucial for growing your social media following. See these 100+ Facebook bios ideas that complement both your personality and your brand.

Top 10 Best Free AI Image Generators From Text
Which AI image generator is the best? We study several factors, evaluate the advantages and disadvantages, and create a list of the top free AI image generators.

Top 10 AI Photo Effects Taking 2025 by Storm
Are you interested in transforming your pictures into stunning visuals using AI? Go through this guide to learn about the trending AI photo effects.

Top 5 Free Photo Collage Makers & Step-by-Step Guide
Looking for easy ways to create stunning photo collages? Explore the top free online photo collage makers and transform your photos effortlessly.

Explore Top 5 Free Mac Photo Editors for Professional Output
Do you want to upgrade the visual outlook of your dull photographs? Try these free Mac photo editors to improve the way your images look.

The Ultimate Guide to AI Photo Trend for Social Media
Are you interested in knowing about the famous AI photo trend on social media? Read this guide, which explains everything about it and the trending photo AI app.

Canva vs. Photoshop: What is the Best for Photo Editing?
The Canva vs. Photoshop debate continues among photo editors over which is the best. Discover which is the best photo editor for your needs.

Exploring the Meaning, History, Symbolism, and Code of Scarlet Color
Are you interested in learning about the famous scarlet color? Check out this guide to learn insights about it and how you can use this color in your photos.

Top 5 AI Selfie Generators to Turn Your Selfies Extraordinary
Do you want to make your selfie stunning effortlessly? Here are the top 5 free AI selfie generators that can help you.

Everything You Need to Know about the NYCxDESIGN 2025
If you're looking to join the NYCxDesign 2025 event and showcase your creativity, here is everything you need to know about the event.

6 Best Photoroom Alternatives You Can Try in 2025
Are you looking for a better and free Photoroom alternative? Read about the top 6 Photoroom similar apps to select the best photo editor.

GPT-4o vs GPT-4: Which One is Better?
Find everything you need to know about GPT-4o, including the comparison between GPT-4o and GPT-4.

10 Must-Try Canva Alternatives for Stunning Graphic Design
Looking for canva alternatives? Check out our top 10 picks!