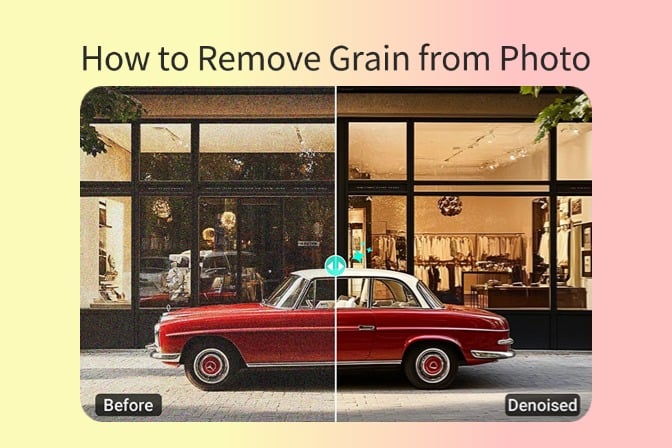
When capturing your precious moments, the pictures sometimes contain noise and appear grainy. These noisy photos can be frustrating as they often don’t seem fixable. However, there are ways to remove grain from photos using various tools designed for noise removal. In this article, we'll go through the workings of 5 different tools to help you remove noise from your photos.
Table of Contents
Key Takeaways
Have you ever taken pictures only to find them ruined by some random specks? The AI noise removal tools now make it possible to fix that, restoring your images to their intended clarity.
- Grainy, distorted photos are instantly restored to polished images with clarity.
- AI noise algorithms offer intelligent noise reduction without over-smoothing the pictures.
- Most helpful in enhancing low-light photos, secondary-sourced images, and long-exposure shots.
- Tools like insMind provide fast, automatic noise removal along with a myriad of other features.
- Bring out the depth in shadows, facial features, and background details that were hidden by noise.
Part 1. What is Noise in Photo?
To learn how to remove grain from a photo, you must first understand what noise is. It is a random variation in the image signals, which happens when irregular pixels misrepresent the luminance and tonality of the picture. Anything from an unadjusted ISO to poor lighting or a long exposure time can result in noisy photos of poor quality that appear unprofessional.

Part 2. Types of Noise in Photos
Before we delve deep into ways to remove noise from photos, find out about the 4 major types of noise in detail below:
1. Chrominance Noise
The random variations in color within a photo are termed chrominance noise, appearing as distorted portions of colored pixels. Found mostly in saturated areas, this noise is related to sensor heating in longer exposures, such as time-lapse photography. Being a distracting noise with blotches of color, it is less common than other types.

2. Luminance Noise
Unlike color noise, this is a random variation of the brightness from the original picture and appears as analog film grains. This type of noise is the most common one and is associated with poor lighting, such as nighttime shoots. Mostly found in areas with uniform colors, such as the sky, it reduces image clarity and sharpness.

3. Salt and Pepper Noise
While trying to remove grain from photos, you may come across salt and pepper noise, which appears as black and white pixels at random intervals. Sudden transients and abrupt switching actions can introduce this noise in images. Mostly caused by data transfer errors, this type of noise is uncommon and is mainly found in corrupt images.

4. Gaussian Noise
This is a statistically patterned noise with a Gaussian model, showing a uniform distribution of noise. Both color and brightness variations are introduced in this particular type of noise. Employed as additive white noise, it is used in machine learning algorithms for simulating real-world distortions.

Part 3. How to Remove Grain/Noise from Photo?
To remove noise from photos, try the insMind Denoise Image Tool with its advanced AI technology to clear up your images. This tool lets you restore, colorize, and stylize your pictures in addition to noise removal.
After you have removed noise from the picture, adjust its aspect ratio to meet the requirement before downloading it. To remove noise from a photo using the Denoise image tool, follow the steps described below:
Step 1. Access the Tool and Upload a Picture
Navigating to the denoise image page, import your picture by clicking on the "Load Image" or simply drag and drop your noisy image from your device.

Step 2. Remove Grain and Noise from a Picture
Choose the "Denoise" option from the available tabs and start the process of your photo. The tool also offers other features like "Colorize," "Restore," and "Style" options that can be utilized to give certain effects to your photo. Additionally, you can access "Advanced Settings" to further upgrade your picture for the desired outcome. Afterward, tap on the "Generate" button to start the denoise process.

Step 3. Download the Denoised Image in HD
Choose from a set of options in "Aspect Ratio" to get the preferred size. Once done, select the "Download Ultra HD" button to save the image to the device. Alternatively, tap the "Regenerate" button if you're not completely satisfied with the results, or click "Edit More" to further edit your image.

So, are you wondering how to remove grain from photos? insMind has made it easy to denoise your favorite pictures with its AI-powered algorithms. If you’re dealing with color blotches, grainy textures, or color imperfections, fix it with insMind in a matter of seconds without any advanced skills needed!
Part 4. Other Tools to Remove Noise from Photo
Apart from the tool described above, there are multiple other tools available online that can be used for effectively removing noise from photos. These tools have their perks and specialized features, including a quality upgrade, free availability for some sessions.
1. MyEdit
Used as a grain remover from photos, this tool supports JPG, PNG, and WebP, among other photo formats. The tool provides a manually adjustable strength for noise removal and offers additional options, such as deblurring, to enhance image quality. Adhere to the steps given below to use the MyEdit tool for removing noise from photos:
- Click "Choose a File" and upload your noisy image from your device.
- After adjusting the "Strength" slider and removing noise, hit the "Download" button.

2. Visual Paradigm
By using the noise reduction tool of Visual Paradigm, you can preview the denoised image before downloading it. It allows for comparison of both images by moving the cursor over the image or further editing it. To remove noise using the visual paradigm denoise tool, go through the given basic steps:
- As you import the image, click on "Start" to initiate denoising and save it by hitting the "Download" button.

3. AI Nero Image Denoiser Online
Being another online tool to remove noise from photos, it specifies the original and denoised image size, which is larger than the picture. An option to upscale the image to an HD resolution is given beside the denoised image. Follow the basic instructions given below to remove noise from photos using this tool:
- After uploading the image, the tool automatically starts denoising the image; click on the "Download" button to save your final image.

4. Pixelcut
The Pixelcut denoising tool allows you to compare the images and undo the denoise to start fresh again as well. It also features advanced editing options, including retouching, upscaling, and enhanced features, for a comprehensive upgrade of images. Proceed with these instructions to denoise your image using the Pixelcut denoise tool:
- Upload your image and compare or save the denoised version to your device.

Part 5. Why Remove Grain in Photos?
The quality and clarity of advertisement and marketing pictures can be enhanced by removing specks and color distortions. Reducing grain in portraits corrects the skin tone and texture, giving them a polished and professional look.
Pictures of inanimate objects, such as landscapes and skies, will be sharper with more accurate color after denoising, featuring enhanced shadows and details. Below are some of the most common use cases for the tools designed for noise removal:
- Enhancing Low-light Photography: Low-light photography often has heavy distortion and grain, reducing its clarity and quality, while most AI noise removal algorithms are trained to automatically deal with dim-light scenarios.

- Upgrading Extracted Video Frame Quality: Film stills and frames extracted from videos often contain significant noise, which can be effectively removed using the batch processing feature found in most noise removal tools.
- Improving Journalistic Snapshots: The shots taken in quick succession or varying unstable conditions can be mitigated with one click from these tools before getting the finest HD result pictures.
- Restoring Photo Archives and Historical Documents: Historical photos and documents can be restored using the aspect ratio adjustment feature available in the tools after the denoise process.

Conclusion
In summary, noise in photos is a significant issue often encountered in images that are unclear, blurry, or grainy. This, however, can be removed through various online tools, some of which are even free to use. Among such tools, we recommend insMind, a denoise tool that removes grain from photos and makes your pictures crisp and high-quality.
Ryan Barnett
I'm a freelance writer with a passion for editing and designing photos. Here at insMind, I strive to educate users on image creativity, photography, and enhancing product photos to help grow their businesses.




































































































![How to Add Logo to Photos Online for Free [The Simplest Method] How to Add Logo to Photos Online for Free [The Simplest Method]](https://static.xsbapp.com/market-operations/market/side/1718795949162.jpg)
![How to Remove Tattoos from Photos [Ultimate Guide 2025] How to Remove Tattoos from Photos [Ultimate Guide 2025]](https://static.xsbapp.com/market-operations/market/side/1718787534476.jpg)
